Glow Wire - Connecting guide
| Tools Required | Materials Required | |
| Wire Stripper | Solder | |
| Cutter | Quality Twin core electrical wire (300v advised. | |
| Flat Nose Pliers | 3mm Heat Shrink Tube | |
| Soldering Iron (30 Watts) | 6mm Heat Shrink Tube | |
| Heat Gun or other heat source | ||
|
How to solder electrical wire to Glow Wire
|
||
|
NOTE: Glow Wire is non polarised i.e it does not have a positive or negative. The wires can be connected either way.
|
||
| Make sure the inverter is switched off while you are making the connections or you may get an unpleasant electric shock! | ||
| Step 1 |
Using wire strippers, carefully remove around 18mm of the outer pvc sleave from the end of your Glow Wire, check that you have not removed the two fine, silvery wires. If you have removed one or two of the wires,carefully repeat this step. If you find that you can remove the outer sleave but not the inner sleave try using some heat, this will cause the inner sleave to peel back.
|
|
| Step 2 |
Wind the two fine wires around the base of the core (as in picture).
|
| Step 3 |
Slide a 20mm length (3mm diameter) of heat shrink tubing over the glow wire, making sure its over the pvc coating leaving space to work on the exposed wires wound in the previous step.
|
| Step 4 |
Cut one of the cores of the (twin core) electrical wire 20mm shorter than the other core. Slide a 30mm length (6mm diameter) of heat shrink tubing over both of the electrical wires, slide it down 15 to 20 cm so that it is out of the way. Using wire strippers remove 15mm of insulation from the longer core (exposing the copper strands) and 3mm of insulation from the shorter core. Wind the 15mm strands around the two fine wires on the Glow Wire (as in picture).
|
| Step 5 |
Scrape 3 mm of phosphor (the white powder coating) from the end of the Glow Wire core, exposing the metal. This can be done with wire strippers or with the edge of a pair of scissors. Lightly coat the exposed metal of the Glow Wire core with solder. Wind the hair like wires of the electrical wire together to form a braid then Coat the 3mm wire of the twin core electrical wire with solder. Solder the 3mm twin core wire to the exposed metal core of the Glow Wire. It should now look similar to the picture.
|
| Step 6 |
Slide the 20mm (3mm dia) length of heat shrink over the connection you have just made. Shrink the heat shrink using a heat gun or other heat source such as a match, carefully move in with the heat to shrink the heat shrink whilst not melting anything else. Finally slide the 30 mm length (6mm diameter) of heat shrink tube from the electrical wire over the shorter heat shrink, make sure each end over lap the heat shrink underneath by 5mm, then shrink with heat. It should now look like the picture.
Depending on the thickness of the twin core electrical wire you use, you may be able to get away with using just the 3mm diameter heat shrink tubing, the length of the heat shrink should then be 30mm in length to make sure the connections are adequately covered. |
 |
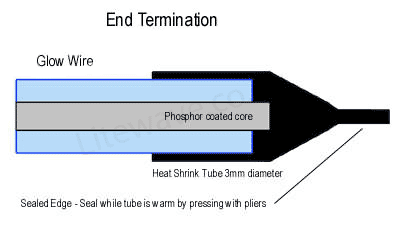
| Remove 3 or 4mm of the outer pvc sleave from the Glow Wire exposing the core, remove the two fine wires. Cut a 20mm length of heat shrink tube, fit half over the end of the Glow Wire and heat to shrink, then press closed the overlapping section with pliers to make air tight. To make the termination water tight seal with hot melt glue, silicone, or super glue, we would advise 3 layers of heat shrink - just to make sure. |
|
Additional Information
|
|
The 12v wire to the inverter can be extended with additional 12v wire, make sure you keep the polarity the same, i.e red to red and black to black. The wire to the Glow Wire can also be extended, this is non polarized meaning it does not have a positive or negative.
|


