How to Connect Your Litewave Architectural LED Strip to a Colour Controller
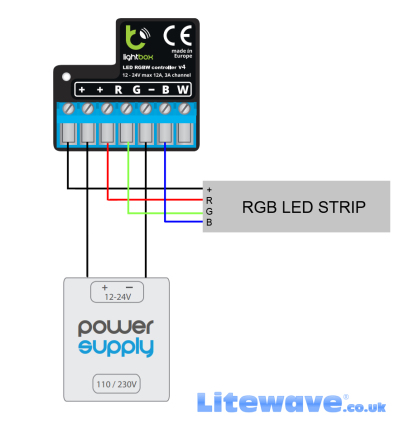
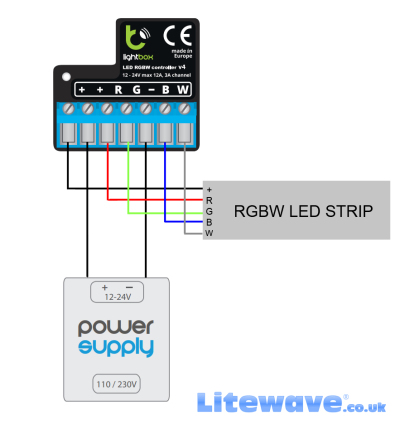
Connecting your Litewave® Architectural LED Strip to the controller is straightforward—with just 6 wires to connect for RGB strips, and 7 wires for RGBW Strips. These diagrams also translate to our RGB COB LED Strips, and RGBW COB LED Strips.
1. Connecting the Power Supply
-
2 wires from the Power Supply:
-
Connect the Positive (+) wire to the + terminal on the controller.
-
Connect the Negative (-) wire to the - terminal on the controller.
-
2. Connecting the LED Strip
-
For RGB LED Strips (4 wires):
-
Connect the Positive (+) wire from the LED strip to the + terminal.
-
Connect the R (Red), G (Green), and B (Blue) wires to their matching R, G, B terminals on the controller.
-
-
For RGBW LED Strips (5 wires):
-
Follow the same steps as for RGB above.
-
Additionally, connect the White (W) wire to the W terminal on the controller.
-
Note: The White wire is often shown as grey in diagrams for better visibility.
-
-
Wiring Diagram for RGB Strips |
Wiring Diagram for RGBW Strips |
 |
 |
Why Choose our Colour Controllers?
-
Supports RGB and RGBW LED Strips
-
Precise Colour & White Balance Control
-
Reliable and Easy Installation
Need help with installation?
✔ Free support with your order—just email us your order number.
✔ Purchased elsewhere? We’re still happy to help, but a support fee applies. Contact us for rates

